
Epoxy shield is one of the best options for a garage floor. With the right application process, you will end up with a beautiful epoxy finish that guarantees long-lasting garage floor.
Preparing the garage floor
- Dust removal: If there is a lot of stuff in your garage, you will first need to de-clutter it. Every single item that’s on the floor needs to be picked up for this project. Now, you first want to remove all the dust particles on the floor as much as possible at this point and the leaf blower makes quick work of that.
- Moisture test: Now, one important step on this project is making sure that you don’t have a moisture issue with inside your concrete. Take moisture test using duct tape. You leave it over for 24 hours. If there’s condensation after you pull off the sheet, then you have a moisture issue and you probably don’t want to do this to your garage because the epoxy won’t adhere properly and it might fail later on down the road.
- Debris removal: At this point, make sure you remove any excess debris.
- Degrease concrete: The best recommended product for degreasing is Rustoleum Cleaner and Degreaser. Pick a nice scrub brush that just makes quick work of a large space.
- Pour the product directly onto the surface. Now, the product does state that you want to wet surface first and then pour all the degreaser.
However, it is a lot easier to figure out where the degreaser is going first and then wetting the floor properly after that. Now, scrubbed the floor vigorously and make sure you don’t let any areas completely dry out. And if you have it, make sure you are using a power washer because it comes in extremely handy in this application.
Also, make sure you have a good squeegee not a cheap squeegee. Get a good squeegee and it’s going to cost like 25 bucks. It is a life saver, maybe not a lifesaver. It’s a time saver though. Yes.
Now just to reiterate and remind everyone, the prep work for this project is the most vital part of this entire project. You can do a perfect job when applying product. But if you’re not prepping the surface properly first, then it could wreak havoc on your garage and that is never good.
CHECK: 5 Best Epoxy Paint for Garage Floor: Reviews & Buyer Guide
Etching:
So make sure you take your time and due diligence with washing it down as well as etching it. A good etching a package is actually provided with your RustOelum Epoxy Shields Kit and you mix it in with two gallons of water.
Stir it, make sure all the granules are actually broken up and dissolved in the water and then pour it onto the surface. Then scrub it down and thoroughly pressure wash all the etching off the concrete slab.
Now you may have to wash this slab off a couple of times to ensure that all the action is off, but just remember that this is citric acid so it might irritate your skin as well as the fact that you can actually literally hear it fizzing off the concrete so it must be doing something right.
Drying process. Now, let it dry. You honestly want the slab to dry at least 24 hours or even 48 hours for it to fully dry.
If there are holes and cracks, then it’s time to fill them. Using a grinder and a diamond blade, just scuff up the area as well as smooth out any large divots. Then take my grinder in start grinding away some of the odder areas in which you want to make sure we have proper adhesion whether it’s paint old oil spots that cars were parked there originally.
You want to grind these areas down to the bare concrete because you can ensure proper adhesion of the epoxy or at least ensure proper bondage as much as possible at this point.
Rustoleum concrete repair and patch kit, which is basically just two thick versions of epoxy that you mix together thoroughly and then apply it to the concrete surface. That only has about a 30-minute working time ,so if you can’t get to all the areas that you want to within a 30 minute period just make sure you’re not mixing the entire thing together.
But the nice thing about it is that it is two different colors which makes the mixing properly portion of this project very DIY-friendly which is always appreciated. It’s alright if it’s not perfectly smooth. Just know that later on when you come back to it, you can sand it after it dries for at least eight hours. As for the crack, try repair and fill the larger cracks that were significant but the smaller cracks just leave it behind and paint it over.
After eight hours, came back and sand it any of the high spots in the rough areas that may or may not have been caused by you stepping in it when it was wet.
Applying the Epoxy
It’s time finally time for Rustoeluem epoxy shield garage floor kit. If you have a large garage, you will need multiple epoxy kits. And it comes with a few different packs, the actual paint color itself, the etching that we actually applied to the surface earlier and then of course the paint chips.
Now, the paint chips are optional so you don’t have to use them but highly recommended because it reduces the variances that you see in the garage floor drastically.
A really nice thing about this two part component is that it’s actually packaged together and we have to do is push on one end and then significantly you mix up the solution however you get to mix it up in the pouch itself. Pour it into a bucket and do stirred around a bit just to ensure have it properly mixed thoroughly. But you don’t have to do a step based upon the directions.
As far as applying, you will need a couple different pavers to see which one actually works better. Also, have a high impact high quality roller and a bucket.
Applying the Epoxy Shield to the Garage floor.
Start on an area that might not be as well seen as all the other places just to get all the kinks out first rate. For this project, the best brush to use is just a flat chipped paint brush, one because it applied the product very easily and well two they’re cheap and they’re disposables.
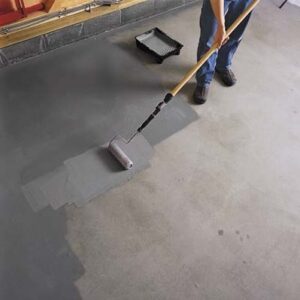
Submerge my roller into the epoxy shield and then apply it evenly and consistently all the way across the floor. This product does cover very well, but this is a one coat application so you need to be diligent and consistent with your application to fully coat the surface in one coat.
It works even better working in a W pattern where applying a thick coat first and then back rolling that entire area so you have an even coverage over the entire surface.
At this time, go ahead and broadcast your paint chips evenly and consistently all the way across. But once you start applying the paint chips you will realize you do want to work in smaller areas because no matter what you have to be able to broadcast the paint chips across the surface and you can’t work in such large areas where you can’t broadcast them evenly and consistently.
Take note of the temperature.
The one thing you do want to think about prior to applying this product to the surface is the temperature. Now, the outside temperature does play a factor with epoxy shield based upon the directions and therefore you should have a temperature between 60 degrees and 85 degrees.
There are specific resting times you need be aware of based upon the temperature outside. So think about the temperature prior to applying this product. This is all indicated in the little chart that they provide in their directions.
As you apply the paint chips, apply the paint chips as far as away from you as possible first and then applying more paint chips that are closer to you afterwards. This is important with the fact that you’re not over saturating the areas closest to you because the chips will fall wherever they may, and it is a bit of an art form to have a consistent coverage of paint chips all the way across the surface.
Another think about when applying this isn’t making sure that you have a wet edge as you’re working in sections because you want to have a consistent coat all the way across and to ensure that you want to have a wet edge so it dries evenly and consistently.
Wait at least 24 hours so you could have a normal foot traffic and then apply the last section of paint. Just remember, you do need to wait at least three days before driving on this with your vehicles because of the weight distribution. Then let it dry.
Conclusion:
That was quite the process and it’s not a short process. If After 24 hours for that coating drying, take my epoxy shield clear finish coat and get this mixed up. A nice quick tip on a paint roller at this point is actually applying some tape to it first and then just removing the tape so you get all those small little fuzz balls off prior to actually soaking your roller in epoxy.
The one thing to think about when applying this product is the fact that this product is not used for exterior purposes, as in it’s not supposed to be in direct sunlight as well as into the elements.
Do LED Lights Work in a Cold Garage?
Contents